
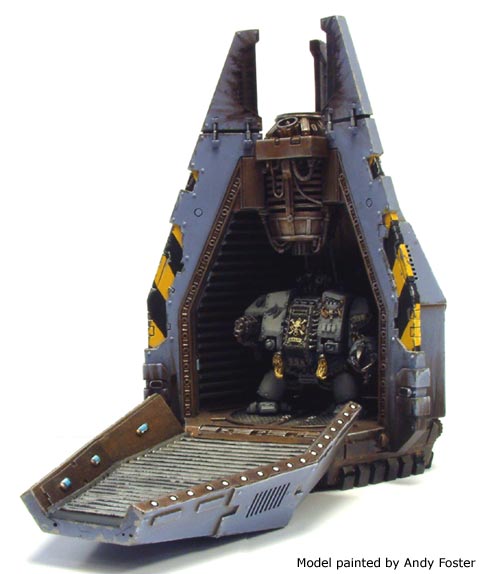
I found this hawt item. Unfortunately I'm not into spending almost 100 bucks on a Drop Pod. So I took to my elite Google searching skills and found this video on youtube. So, a Dread CAN fit in a GW Drop Pod. Bloody Brilliant. Well, I'm here to share how to complete this man's genius idea through my own tutorial. *Queue Mr. Roger's Neighborhood Theme Song* Join me, won't you?
First, let's get this far in our construction. Take 2 of the "fins" and cut the bottoms of them off like so:


Using the same lovely dremmel bit from my last tutorial makes this job cake:

Next, let's construct the base like normal:

Next take the harness' and cut off the 2 different portions below so all 5 look like this:


Put the harness bay together like normal, but do not glue it to the Drop Pod. Hey! Don't you.. don't... don't do it! Put that glue down! All right, moving along..

Next we'll construct the 3 "un-cut" fins, 2 of the trapezoid-ee thingies that goes in between the fins at the top and the top-engine-thingy normally like I've pictured here:

(Look at all 'those thingies...)
For the next step, pay very close attention to the pictures below, and click on them for close-ups. We want the end result of the 2 remaining fins to look like this:

(Leaving the middle door fin-free, we want the 2 surrounding doors to have the 2 fins glued to them like the picture above.)
We'll achieve this by applying glue to the fins on the patterned lines like so:

And gluing them to the doors, so that when closed, will look just like the fins that are glued to the base. Take your time with this step:

(If you can't tell which fin is attached to the base and which is attached to the door without looking at the bottom, you've done this correctly. Good job!)
Once your doors look snazzy, take one of the 3 remaining trapezoid-ee looking thingies and glue it for the center section/door:

For the other 2 trapezoid-ee thingies we'll want to cut them like so:

So they look like this when glued on the Drop Pod:


(Doing so should allow your "fin-doors" to open/close without issue.)
And there you have it, a Dreadnought Drop Pod that can also be converted to a normal Drop Pod by placing your harness base inside (the tabs on the bottom of the harness base are more than enough to hold it in place without magnets... I... I never thought I'd say the term "without magnets"...)


Oh, and uh... Don't forget to magnet your weapons! Weeeee!


Until next time!
You had me worried for a second. Another conversion without magnets could have serious repercussions on the fabric of reality and I know you don't want that.
ReplyDeleteI don't play marines, but I appreciate good workmanship...and this, Sir, is superb!
ReplyDeleteThanks for sharing.
- D.
Hello:
ReplyDeleteI'm from colombia, and your tutorial help me a lot in order to build my own dread pod.
Thanks a lot!
So glad I could help!!! =D
ReplyDeletedoes the dreanought fit with its base?
ReplyDeleteNot with the base, no. But if you magnet a Dread to the base you could have him fit in there without it.
ReplyDeleteLantz this tutorial was spot on mate; got my Death Company one made up and undercoated ready for my Autumn painting push.
ReplyDeleteCheers :)
Awesome tutorial. I wanted to be able to fit a based dreadnought in a pod, so I took your directions a little further.
ReplyDeletehttp://fizzit-fzam.blogspot.com/2011/01/40k-dreadnought-drop-pod-conversion.html
Thanks for the inspiration :)
Thanks much Bix and Jon! I'm excited to see others using my tutorials for their own armies!
ReplyDeleteI just checked out your link, Jon. I must say you took the idea and pushed it to the limits. Superb work!